You’re going to need these 13 tips to speed up your Lightroom workflow. Let’s be honest, Lightroom is fantastic when it’s humming along. Editing a full days wedding, in less time than it took to photograph is always my goal.
But reality is, Lightroom can and will slow down over time. If you’re unlucky it will even happen during an editing session.
These tips will keep Lightroom speeding along. 8 of these tips you can do right now, in 10 minutes or less.
So, let’s get started!

1. Keeping Lightroom Up To Date
Software updates can sometimes give you a little speed boost.
No software is perfect, which is why software companies like Adobe, regularly release updates to fix bugs and improve their software.
Generally Adobe will have a major release of Lightroom, where new features are added. Followed by incremental releases to take care of any bugs, but sometimes can also included extra features in these incremental updates.
Don’t forget to also keep your operating system up to date. This should include your hardware drivers, especially your video card driver.
Also doing a regular disk defrag on your mechanical hard drives will keep them humming along. Note: you can not defrag solid state drives.
2. Get the right computer for the job
Photo editing can be computer intensive and having a computer that can handle that workload will make your Lightroom workflow that much faster.
If you purchase with the future in mind you can possibly get 3 – 5 years out of your desktop computer before a major upgrade is needed in computer hardware.
My personal preference would be to actually use a desktop computer with a large screen rather than using a laptop.
Even though I do use both in my business, editing on my desktop is a lot faster and allows me to be in a comfortable position for longer hours.
Comfort: A larger screen will allow you to edit more comfortably and been able to see your photos larger, making it easier to spot any issues such as soft focus photos.
Price: For a comparable price you can get a desktop that is a lot faster and has a lot more hard disk space and processing speed and ram and faster graphics card that what you can buy in a laptop form.
High Performance Editing Desktop
If you have the luxury of custom building your own computer or paying a local computer shop. I recommend the below hardware.
- Intel Core I7 processor
- 32 gb RAM,
- Video card with 4gb ram
- 3 drives, one for your OS and Apps, one as a working drive and a third drive as storage
My Operating system drive and working drive, where I keep photos I’m actively working on are solid state drives. The difference is instantly noticeable.
These specs have given me a fast editing desktop that can handle anything I’ve put it through so far.
TIP: If you have the money, use a solid state drives for your OS and working drives. Otherwise a 7200rpm SATA drive will be fine.
Budget Editing Desktop
If you are on a budget but still want a desktop that will last a couple of years. As a minimum, I would recommend the below equipment.
- Intel Core I5
- 16gb ram
- Video card with 2gb ram
- 2 drives, One for your OS and apps, one for storage
Not ready to update your computer?
If you’re not ready to upgrade to a new computer and would like to get another year or so out of your existing system. Provided that you have a good processor like a Intel i5 , then just update your hard drive and ram will get you by.
Solid State hard drives: Can give you an instant speed boost that is definitely worth the extra money you’ll pay for the privilege of having a solid state hard drive.


Solid state hard drives work very similar to how your memory card in your camera operates, there are no moving parts and access is super fast.
If you coming from a regular mechanical hard drive. You will definitely noticed an increase in the startup of your computer, how your Lightroom loads and operates, and of course accessing your photos is much quicker.
RAM: If your system supports adding additional ram. Then put as much as your system will hold. More ram in your computer will allow you to open more files and larger files but as an added bonus your software will run faster since your computer can load more into memory.
3. Use A Fast Card Reader To Import Your Photos
Investing in a fast card reader is a quick and inexpensive way to speed up your photography workflow. You can get a super fast card reader like the Lexar USB 3 card reader. It can read both SD & CF cards and is super quick.


I have several of these readers, they are compact, the USB cable can be removed making the unit even smaller and perfect if you are travelling.
But this only half the equation, to get maximum speed you also need a memory card that has a fast read / write speed like Sandisk memory cards. The fast write speed helps to empty the camera buffer after using burst mode. Fast read speed is useful to download your photos faster to your computer.


An added bonus is the lifetime warranty on the cards which is a nice touch.
Just updating my card reader and memory cards, saved me up to 10 minutes per 32gb card. Most weddings i go through 4 cards, that’s 40 minute saving even before i’ve even opened Lightroom.
4. Using Smart Previews To Speed Up Your Lightroom Workflow In The Develop Module
With the release of Lightroom CC (2015.7) and Lightroom 6.7 Adobe have made it easier to select smart previews on import and in the preferences is the option to use smart previews instead of the originals when editing.
Smart previews are not a new thing, in fact they have been around for at least 3 years. They were designed for editing and viewing your photos, when away from your main system.
The ability to do editing while on the road, and then sync with your main catalog when you got back is very appealing. As a direct result editing in the develop module sped up due to smart previews using a smaller file.
Smart previews are made up of DNG files that are 2504px on the long side and must smaller in file size than a RAW file.
Turning smart previews on in Lightroom preferences
- Goto Edit, then Preferences in the Lightroom menu
- In the Preferences dialog, select the Performance tab.
- In the Develop section, select Use Smart Previews Instead Of Originals For Image Editing.
- Click OK and then restart Lightroom.
5. Use 1:1 Previews To Speed Up The Viewing Of Your Photos
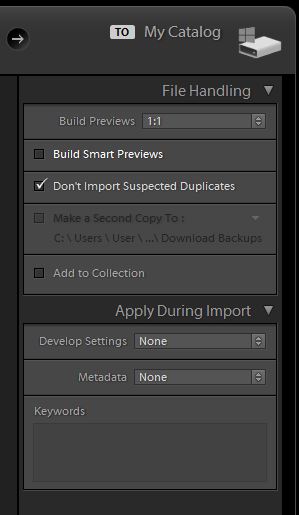
Creating 1:1 previews on import is a good way to speed up your Lightroom workflow when it comes time to view and edit your photos.
The initial ingest of your photos will be slightly slower, but you’ll see the benefits when it comes time to edit in the develop module.

1:1 previews only help in the develop module only when moving from photo to photo and zooming in out of your photos.
When you create 1:1 previews, you are in fact making 3 previews of your photos, minimal, standard and the full size preview.
Don’t bother selecting minimal previews thinking that it will speed up Lightroom. In fact if you select minimal on import and start viewing your photos and editing them. Lightroom would actually start making the standard and full previews in the background, as a results making your system slower.
So it just makes sense to do the 1:1 previews in the beginning when you import.
6. Using Lightroom Presets For Repetitive Tasks
I love Lightroom presets, they have changed my whole workflow. So much so, I have created my own presets for every aspect of my editing within Lightroom.
Importing, editing and exporting with in Lightroom can all be streamlined with presets.
To successfully use Lightroom presets in the develop module , use them as a starting point, and not as an endpoint.
Using presets during editing
- Apply a preset to a photo and tweak the photo to your liking, most of the time it’s slight exposure or highlights tweak.
- If there is a group of photos that are in the same time frame or similar exposure.
- Copy the develop settings of the first photo and paste the settings to the rest of the group.
- Then individually tweak those photos to your liking, that’s how you should be using presets to speed up your Lightroom workflow.
7. Proper Photo Organisation Goes A Long Way
Photo organisation is such an import part of having an efficient workflow. Start the organisation process from the moment you download the photos to your hard drive.
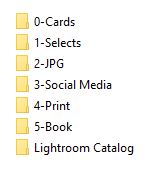
I like to organise my photos starting with one folder per event or job or even occasion. Within that folder there will be folders for my raw files, select photos, my jpegs and other photos that I use within my photography workflow, such as exporting photos to social media or even creating albums for my clients.

I should also point out that I have my Lightroom catalog is also within this folder as well.
The advantage doing it this way, makes the backing up process of my photos and catalogs so much easier.
I know that at the end of the year, I will have the years worth of photos and Lightroom catalogs and all the exported jpegs from that year on one hard drive. Which of course is duplicated to two other drives that are off site.
Another example.
Say I needed to get some photos from a few years back and I no longer have them my main desktop. It’s a matter of going to my backup drive, and locating that one folder which has everything related to that job, event or occasion.
Simple, right!
8. Culling Your Photos Before You Start Editing
As much as we like to think we can multitask. It’s proven that to do tasks efficiently and properly you should dedicate all your attention to the task at hand.
Keep your mind on one task at a time. Cull first, edit your photos 2nd
Don’t confuse yourself with rating or rejecting photos and then working out which photos to edit. It’s not the fastest, most efficient use of your time. By only tagging the photos that you wish to edit, Will speed up your culling by a considerable amount.
Rather than rejecting the photos you don’t want or even using the start system or rating system will just make culling take long.
How to cull fast in Lightroom
Using the ” P “ key to pick or tag a photo in Lightroom.
- Open Adobe Lightroom and either using an existing catalogue or create a new one.
- From the grid view press ctrl + shift + I to bring up the import dialogue or simply use the import button bottom left hand corner.
- Select images from a source folder, make sure you have build 1:1 previews and smart previews selected. It’s up to you if you want to copy move or add your photos. I would wait for the 1 : 1 previews to build before you start culling as it does speed up the process.
- Compare several photos at once, select a handful of photos and use the “ N ” key to put them in survey mode
- Use the “ P “ key to tag only the images that you would like to edit.
- Once you have finished going through your photos , Use the filter option in the bottom the right hand corner and filter out only the images that you have selected.
9. Taking Photos With A Purpose Will Mean Less Time Editing
Don’t be a spray and pray photographer or worse a photographer that says they will fix it in post.
If you do you will simply come away with a lot more photos which are rejects or you will spend way too much time editing one photo simply to make it half decent.
Visualising your photos before you press the shutter is taking photos with a purpose.
It’s ok to take more photos than what you need, do it purposefully.
Say you were to take a photo of a scene and you realise that there is something distracting with it. Make adjustments, so your photo is composed better. Keep on adjusting until you are happy with the end result.
As a result your time spent editing in Lightroom will be far less.
Pre-visualize your photos before you press the shutter button
- Wait for the right moment, don’t just take a snapshot
- Think about why your taking the photo
- Think about your composition
- Think about you’re backgrounds
- Think about what the end result for your photos are going to be
10. Using Keyboard Shortcuts To Speed Up Your Lightroom Workflow
Learning Lightroom’s keyboard shortcuts, also known as hotkeys is an excellent way to cut out unnecessary usage of the mouse or trackpad.
Using a combination of keystrokes, allows you to quickly access menus, and various tasks within Lightroom without the need to take your eyes off the screen, their for speeding up your editing and reducuing RSI when using a mouse or trackpad.
My favourite and most used Lightroom shortcuts
Alt or Opt key
Shortcut: Win – Alt key Mac – Opt Key Is one of those versatile keys. Press it by it’s self and a REST option will appear for your sliders.
Press the key while using a slider and it allows you to visually see what the slider is doing. For instance when using the highlight slider your photo will black out and and only the highlights will be shown.
Survey Mode
Shortcut: N key I find this extremely useful when I have a group of similar photos that I want to compare
Before and After
Shortcut: Y – Useful to see what you what your editing looks like compared to the original photo.
Create a Virtual Copy
Shortcut: Win – Ctrl + ‘ Mac – Cmd + ‘ Create a virtual copy of the selected photo. I use this alot with the next two shortcuts.
Copy Development Settings
Shortcut: Win – Ctrl + Shift + C Mac – Cmd + shift + C This would Without a doubt would have to be My most used shortcut when I edit. Copy development settings a dialogue will show up and you can select the setting you wish to include or exclude.
Paste Development Settings
Shortcut: Win – Ctrl + Shift + V Mac – Cmd + Shift + V Paste the currently copied development settings to the selected photo.
11. Keep Your Camera Sensor And Lens Clean To Reduce Extra Post Processing
Having to remove sensor dust from my photos is a pet hate of mine. It’s a waste of time and can really slow down your editing time.
Plus the spot removal tool in Lightroom can really bog down, if you need to do a lot of work on a photo.
If I have to do a lot of work on a photo, my preference is to export to Photoshop and use the patch tool as i find it so much faster.
So the first thing I do when preparing my equipment for a photo session is clean my camera equipment.
A simple clean of both the front and rear elements of your lenses, takes only a few minutes using a blower and cloth.
As for the sensor, NOT changing lenses in windy conditions reduces camera dust. If you really have to change your lens in non ideal conditions. Do so in your camera bag with the camera body turned off and pointing down.
You can purchase a sensor cleaning kit from Amazon. If you don’t feel confident, then sending you camera for a service is a good idea.
12. Optimise Your Lightroom Catalog
I generally assign a separate catalogue to each job with in Lightroom. So this next step I have not personally seen a big difference, even though I have at least 3000 photos per catalog.
Since I do regular catalog backups, ever every time I exit Lightroom. The software takes care of optimising the catalog and does an Integrity to make sure that it’s not corrupt.
If you have a larger catalogue say, 10,000 or more photos and then you may see the difference.
Go to To File > optimise catalog to do it manually.
13. Increase The Camera Raw Cache Size In Lightroom
Lightroom’s camera raw cache is there so that every time you edit or view your images in the development module. It keeps any changes that you have been applied.
By default Lightroom sets the cache to 1 gb. Try setting your case from 1 gb to 10 gb or even larger provided that you have ample disk space, and it should give you a slight speed boost.
Remember I talked about having a fast hard drive? Well having your cache on that fast Drive will benefit you as well.
To increase your camera raw cache
- Choose Lightroom > Preferences (Mac OS) or Edit > Preferences (Windows).
- Click the file handling tab
- Change the size from 1 gb to 10 gb or more.

Leave a Reply
You must be logged in to post a comment.