If you’re new to Lightroom it can seem quite daunting at first. But once you know some of the Lightroom basics it is quite simple and a very well thought out piece of editing software.
From the outside though, Lightroom can seem complex.
The idea of having a catalogue, can be quite confusing especially if you come from a software package such as Adobe Elements, even Adobe Photoshop.
Where all you did was open the file you wish to edit, make your adjustments and save the file either as an original or as a copy.
It’s pretty straight forward, open, edit and save. Simple!
Lightroom is a little different as it is allows you to do none destructive editing to your photos. It does this by keeping all your editing information in a database called a catalog.
Lightroom does not physically apply those changes until you export the photos out of Lightroom. At which point the software uses the information stored in the catalog and makes copy e.g Jpg , Dng, Tiff of the original photo, so your original photos never gets edited.
Pretty cool huh!
To edit a photo in Lightroom you first need to add your photos to a catalog, This is so the software can store information about your edits.
What you should remember is that the catalogue does not hold your photos. What is does is simply store information of how you’ve edited your photos and other information about your photos like, location on hard drive, meta data, keywords, exposure, contrast, sharpening etc..
So your photos are still in the same place as to where you originally placed them on your hard drive. The catalog simply has information about where they’re located and what edits you have done to those photos.
I’m going to break down Lightroom into 3 sections or major steps, this is especially useful if you’re only just starting out. Of course there are other aspects of Lightroom like collections, presets, key wording etc.. but we are going to keep this simple to get you started quickly with the Lightroom basics.
Related Reading: Part of an efficient workflow involves proper organisation of your photos on your hard drive.
The lightroom basics in 3 simple steps
Import – Add , move or copy your photos into Lightroom using the import dialogue box
Edit – Make the necessary adjustments to your photos using different sliders or presets
Export – Getting your photos out of Lightroom using the export dialog box.
Once you understand the concept of these 3 Lightroom basics, you’ll be able to progress onto more complex concepts such as collections and using presets to organise and speed up your post processing.
Importing: Getting your photos into Lightroom.
- When you launch Lightroom you’ll be asked to select a catalogue or using an existing catalog. Remember a catalog is the database that holds information about your photos, it does not physically store the photos. Lightroom does not physically store the photos with in the catalogue it is simply points to your photos on your hard drive where you’ve placed them.
- Select either create new catalog or using an existing catalog if you have one.

- Move your mouse to the left hand panel at the bottom you’ll see two buttons import and export and click on import button.
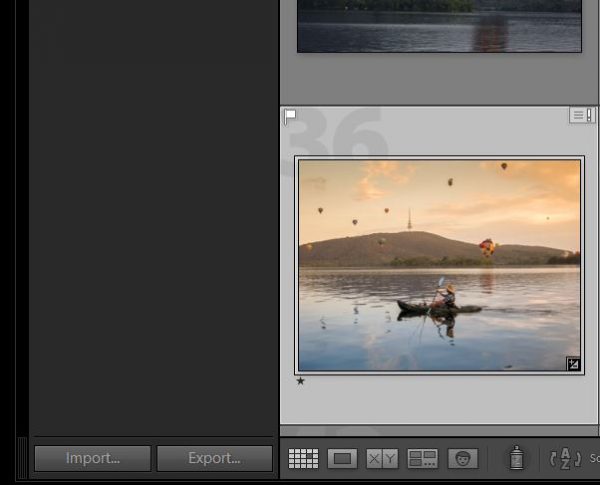
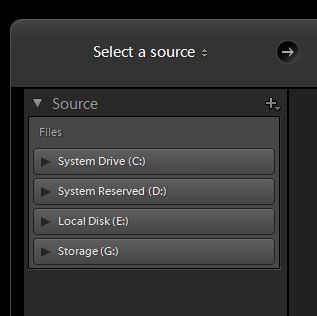
- The left-hand side will have a file browser where you can select the source of where your files are kept.
- At the top you’ll see the options of copy as DNG copy move or add. NOTE: I recommend that you leave the photos in the original location and click on add. Remember that Lightroom does not physically edit the original file as it uses non-destructive editing.

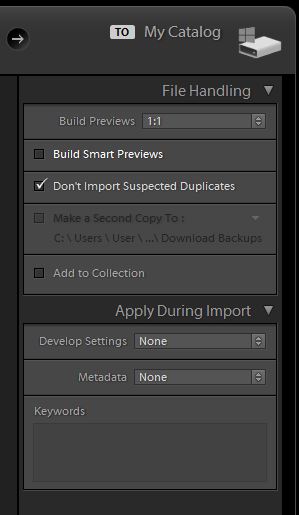
- Next on the right hand panel is file handling is recommended that you build previews 1:1 , doing so will help you when you’re looking at your photos In the develop module. As an added speed boost checking build smart previews helps when you when looking at your photos at full screen in the library module.
- Press import, now it’s just simply waiting for Lightroom to finish importing of your files into a catalog.
- You will notice there is a status at the top left hand top toolbar left-hand side, once it’s finished you’ll you can start editing your photo. TIP: It is possible to edit photos while Lightroom is importing but on some computers it will slow down the process.
Related Reading: Learn to cull your photos and speed up your editing.
Edit: How to do basic editing in Lightroom
Now that your photos have been imported into Lightroom. Let’s learn how to do a basic edit in Lightroom. When the imported process starts you will be brought to the library module. From here you can sort, organise and view you photos.
Lets do a basic edit on one of your photos.
- Select an image with your mouse and press the D key on the keyboard which will bring up the selected photo in the develop module.
- What’s in the develop module on the left on the right hand side you’ll have a panel with lots of panels within it’s and we just going to work with the basic panel which is located at the top.
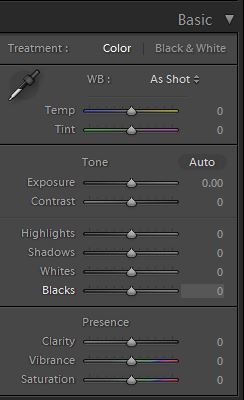
- Start from the top of the basic panel and work your way down. Not every slider needs to be moved, so start on the TONE panel and work your way down. Exposure, Highlights and shadows are sliders that you will use often.
- TIP: Try the AUTO option, This can sometimes be a good starting point. It’s not always perfect though, I find that the exposure is usually off and so are the highlights. But it’s a a good starting point to see what sliders have been moved and then start tweaking those changes to suit your needs.
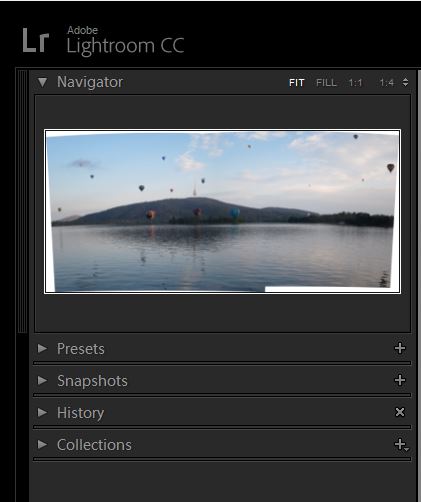
- In the left hand panel on the bottom there is a panel called history. This is where you’ll have all the a list of all the different adjustments you made to your photo. You can click on each different adjustment in your see how your photo progressed
Export: Exporting your edited photos out of Lightroom
When you have completed editing your photos, it’s time to do something with them and the way you get your photos out of Lightroom is by exporting them out.
Remember how we talked about Lightroom uses non-destructive editing. So right now we have our originals on the hard drive and we have in the Lightroom catalogue with all the adjustments you made to your photos.
When we export out photos, Lightroom will reference the original file and make a copy and add your adjustments to create a new photo. So in the end we will have the original file which which does not have any edits and we will have a second file which has all over edits 4 ml editing.
Note: If you imported RAW file format, You will need to choose JPG, DNG or TIFF on export. Lightroom can’t save the files to your camera manifacutrs raw format. The closets thing it can do it save in DNG format ( digital negative ) the file format is not a large as a raw file but it is not compressed like JPG.
One of the cool things about export module in Lightroom, is that you can get it to do several exports at the same time.
One example would be, and I use quite often myself is to export the full resolution photo which is perfect for printing and then at the same time export a second set which are sized much smaller and that I used to upload my online galleries.
BUY NOW: 23 Lightroom Export Presests
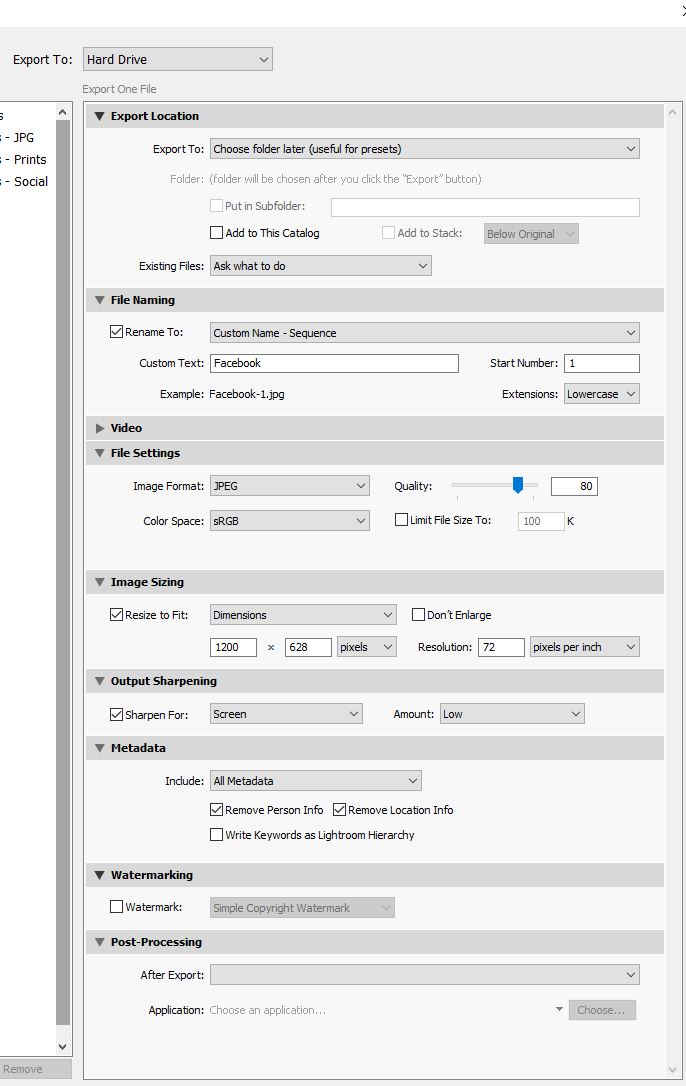
To do a simple export with Lightroom follow the below steps. If you want to run several exports at the same time, simple repeat the process. Note: the more exports you have running, the longer it will take to completed all the exports.
- Select a photo or a group of photos that you would like to export .
- Use the keyboard shortcut ctrl shift + E and the export Dialogue box will appear.
- Export location: Choose the locaiton on your hard drive you wish to export and save your photos.
- File naming: Give your photos a file name and start number if you have multiple files.
- File settings: Select your file format e.g JPEG. Set the quaility e.g. 70 – 80 for web 100 for printing. Colour space leave as sRGB for web use or printing. Some labs prefer RGB, but it’s best to check before sending your files.
- Image Sizing: Set the dimensions of your photos
- Output sharpening: screen and low, works for the web and some printing labs.
- Press export
Conclusion
When I started using Lightroom I was overwhelmed with the interface and the idea of having a database. I just really didn’t know where to start. After breaking down the three tasks of importing, editing and exporting. These 3 simple Lightroom basics gave me a good foundation for my photography workflow.

Leave a Reply
You must be logged in to post a comment.