Adobe released a new version of Lightroom and it’s confused and upset a lot of people.
Lightroom CC has now been renamed to Lightroom Classic CC and the new version has become Lightroom CC, confusing right!
The new Lightroom CC is definitely targeted towards a different market than Lightroom Classic CC.
If you have been using Lightroom as part of Creative Cloud photographers subscription where you get both Lightroom and Photoshop. No changes for those people other than the name change and you do of course have access to the new version of Adobe Lightroom CC
The difference between the two versions is mostly in the features set each version offers.
Here is a link to a video by Julieanne kost, Adobe evangelist explains what the major differences are.
So I won’t be rehashing all the information that she’s gone through, she’s did an excellent job in the video.
What I will do is help you workout which version of Lightroom is right for you.
Instead, I want to go through the pros and cons of both systems, and how it relates to to a photography workflow. so you have the enough knowledge to work out, the right version of Lightroom for you.
Since Adobe offers both as separate products. The new Lightroom CC is also on a monthly subscription and if you have the photographer’s package which includes Photoshop CC and Lightroom Classic C you get the new version as well,
But should you use it?
What is the difference Lightroom CC vs Lightroom Classic CC
Let’s start with Lightroom Classic CC, started 10 years ago as a standalone version and then moved to a subscription model which Adobe bundled with Photoshop and become Lightroom CC and Photoshop CC, part of the photographers package, recently changing the name to Lightroom classic CC.
Other than a name change it’s is still desktop software for mac and windows, you use it exactly the same way your presets work the same, your catalogues also operates the same way as it has in the past.
Lightroom classic is very much a mature product that Adobe have spent many years developing and has become an industry standard for most photographers, especially photographers that deal with a lot of images and require cataloging of the images.
This update of Adobe Classic CC apart from a new name also is a little bit faster. When you open up Lightroom Classic CC for the first time you’ll notice that the update has definitely made launching faster, moving between the library and develop modes and importing photos has become faster.
The develop loop has also seen improvements to faster selection of embedded previews, allowing you to work with your images sooner and lastly more control over your selections with the masking tools using the adjustment brush radio and Graduate filters.
The new Lightroom CC is also a desktop application that syncs all your original photos into the Adobe’s cloud storage.
You will notice when you open up the application it is very simple and minimalistic.
It’s user interface is very similar to the mobile version of Lightroom, those that have used Lightroom Classic CC may have a slight learning curve, to find their regular used tools.
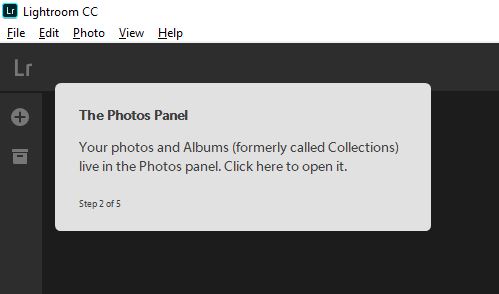
You also will notice that some options have different names for instance what was formerly known as collections is now called your photos and albums.
My first impression is that It feels, Adobe is trying to simplify Lightroom and target the new photographer. The interface is much simpler, you to be able to see the histogram you need to turn that option on CTRL+ 0
You still have the option to use Photoshop CC to further edit your photos and when you do so it does open a file as a TIFF file
Old lightroom = Lightroom Classic CC
Ok put your hand up if you think Lightroom is slow?
Well it seems that Adobe has been listening to us and basically did something about it.
With the new name change also comes with some added speed to the application as a whole. Editing photos in Lightroom Classic is now very snappy.
You can go between photos quite quickly, applying Presets is pretty much instant as well.
Thank you very much Adobe!
It also seems that the auto tone has been reworked and it doesn’t over exposes the photos.
I always found that the Blacks and whites were really good, but when it came to exposure sometimes up 3 /4 of a stop too much. I’m glad that has been worked on. As Auto exposure provided a good starting point when you weren’t sure.
Before I go into some of the options for Lightroom CC I just want to make a point hear that Lightroom Classic is a much mature product.
It’s features when it comes to editing have been developed over the years So naturally it is going to have more tools on offer.
How will your photography workflow be impacted?
My production of photos is little bit unique to some. I make my living as a photographer and also I have a couple of blogs that I photograph for.
I also have a young family, and like most of you photograph on multiple devices. From mobile phone, DSLR and even a Point & shoot.
Bringing in a new piece of software and making it work to an existing photography workflow needs to be done in a careful and calculated manner.
Just because we have new software, doesn’t mean we should use it.
Importing Photos

Importing photos is extremely straightforward with the new Lightroom CC.
- Simply go to the right toolbar click on the + icon
- Select your images and click on review for import.
- You have the choice to add your images to an album ( collections ) on import or not.
I do wish you could double click on image to make it larger to inspect it, at this point in time it’s not possible.
It’s also not possible to copy, move or add your photos. You also can not apply presets on import or add keywords or any other type of metadata.
If you use any of these extra features in your photography workflow that you would normally find within Adobe Lightroom classic You’ll find it limiting the software limiting.
User Interface & Layout

Compared to Lightroom Classic, the new Lightroom CC user interface and layout is very minimalistic and clean in design.
Lightroom CC uses the four sides of the screen, the top, bottom, left and right and the tools that you expect to be in those respective locations are mostly still there.
Adobe has taken a very simplified approach to the layout or hidden tools and options via a keyboard shortcut or menu option.
Adobe has rearranged and renamed development sliders. I guess they assume a new photographer would find a bit more intuitive, so breaking up the basic panel into two and reduce the amount of tools on offer or at least very much simplified them.
First thing you notice is that there is no histogram. This option will need to be turned on by a menu option.
In fact every menu bar and screen has been stripped, right back to the bare essentials. This could be due to it being version 1 or maybe they are going for a particular level of photographer and competing with products such as iPhoto.
It’s too early to tell, but the tools that are included very much adequate for most people’s editing.
Tools, Toolbars & Shortcuts

With a new interface comes new toolbars and unfortunately for the power users new shortcuts to learn.
Adobe has at least kept the majority of tools in the same locations as where you would expect in the Lightroom classic version of the software.
Your importing and organising tools towbars on the left-hand side. Presets have been moved to the right hand side down the bottom and as you’d expect the editing tools and panels are still on the right hand side
Searching your catalogue for images is still at the top and down the bottom you have your flags and star ratings along with display options for your images.
Missing are colour flags, but you can still star rate your images.
Also missing is the history panel although you can an old said it’s just not quite the same.
Adobe have kept stacks in and albums, which used to be called collections in Lightroom classic
File explorer is also missing and you have to use the computer file system to search for photos to import.
A pleasant surprise is that you can still export to Adobe Photoshop to do more heavy editing. A tool that you would have expected to be included is actually missing and that is red eye correction.
The Lightroom Catalog

This is a selling point for Lightroom CC vs Lightroom Classic, Adobe has simplified the whole process of using a catalog.
Catalogs are great they hold information about out images such as our edits, keywords, meta-data and to search how photos as well.
If you’ve used Lightroom long enough, especially over a couple of computers, you know the catalogue in Lightroom classic can be a limiting.
Moving photos outside of Lightroom causes issues with the database not knowing where your photos are.
There’s also the issue of using multiple computers with the same catalogue. A common request is for the catalogue to work on a network but not really possible.
The new Lightroom CC solves the issue with using a catalog and multiple computers or devices at the the same time, because he files are also backed up to the cloud.
I would imagine the whole point of using a back up in the cloud ( Adobe servers ) is to allow photographers to be able to use the Lightroom catalogue how they’ve always wanted, over many devices or two machines at the same time.
To achieve this they have to make it work a certain way and by making a backup into the Cloud and storing it there is one way of doing it.
One of the most simplest way with one central location, for your photos to reside and that is key to be able to achieve this.
Simplifying the catalog and being able to access your photos in easily will definitely see a lot of new photographers taking on Lightroom CC. The won’t have to think about the catalogue like theyhad to with a Lightroom Classic CC.
Using the power of the catalogue to search

If you’ve put in keywords you can still search by keyword. You can also search by or sought by camera and locations.
To add keywords simply Pressing the k key relate to do that and if you want to find more information about the actual image you hit the I key and when you do, your presented with a panel that gives you the information about the metadata about the image.
It also has location with Google map and Sync status
It’s excellent to see Adobe is trying to help the photographer to minimise any loss of photos. So the photos are backup locally and a copy backed up into the cloud.
The question is what do you do when you’re trying to use this for large amount of photos. Will the sync consistently be running o keep up with the to upload a large volume of photos?
I think using Lightroom Classic CC is definitely the way to go for larger photo sessions such that a event or wedding photographer would take. But maybe if your on vacation and you have a good internet connection it can be a good way to keep your photos safe.
Lightroom CC comes with 1Tb of space with the monthly subscription. Adobe has worked it out to about 20,000 raw DSLR images or 200,000 JPEGs
Editing Photos
Apart from the renamed tools, Lightroom CC has a very simplified tool set on offer.
You’re not gonna find the tone curve, split toning or the HSL slider either. But does come with the healing brush, linear-gradient the radial gradient brush.
For simple editing, I think has Adobe has given us all the necessary tools to get the job done.
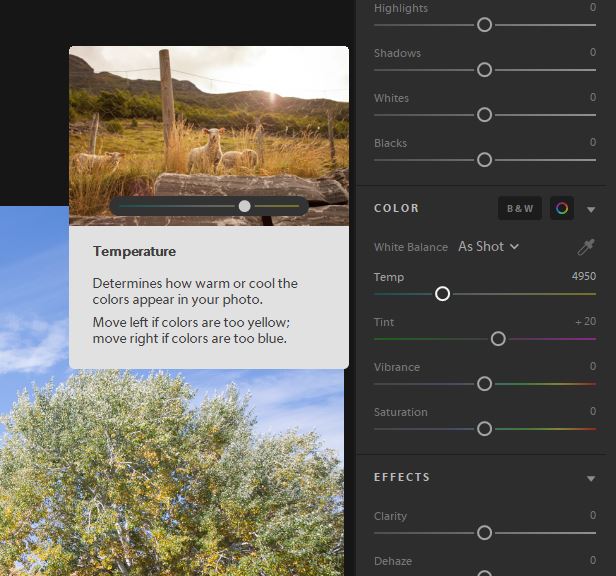
I really do like the tool tips for new photographers. Hover over the slider name on the development panels, a brief description of what the tool does and and animation of what will happen to the image if you were to use that tool.
I wish that was available when Adobe firsted released Lightroom. It would have answered a lot of questions, for many new photographers.
The new Lightroom CC comes with some pre installed presets. If you have existing presets, that you created or purchased you can bring into this new version as well.
I uploaded my presets that I used in my develop workflow including the presets I sell on my store and they worked as expected.
You can create basic presets within the new Lightroom CC. Saving the preset you pretty much make your adjustments in the panel, Click on three buttons and select create preset.
The actual editing of photos is quite quick and using your old presets works the same as you would expect.
You do have the option to copy and paste development settings to other photos but are limited to only one photo at a time. I’m hoping this will change as the product matures.
If you edit high volumes of photos it is best to stick with Lightroom Classic CC.
Presets
I was really interested to see what is possible with Presets in the new Lightroom CC.
I’m someone that uses presets throughout my workflow. Starting from import all the way to export. I was worried that I would have to redo all my Presets.
Fortunately, the Lightroom develop presets that we’re designed to work in Lightroom classic will also work in Lightroom CC.
Now the unfortunate part is that you can’t assign presets on import like a camera profile or develop preset. Also no presets on exporting your images. Print templates in the print module have also been omitted.
If you rely on presets to speed up your workflow you’re limited to the develop module at this point in time.
Exporting Your Photos

Unfortunately Lightroom CC does not allow you to create presets to export your photos. The option to export your photos is very limited.
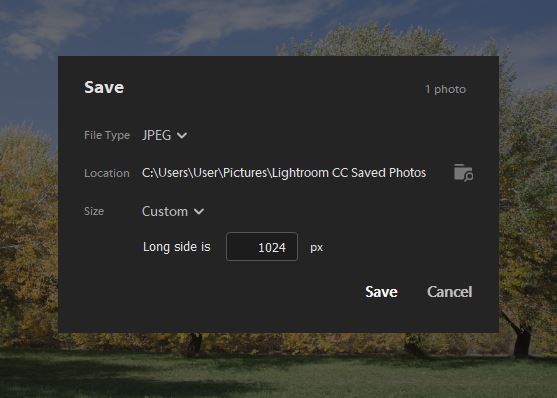
Your options are saved directly to Facebook which is great if that’s the type of thing you do or you can save to disk as a JPEG or even the original + settings which I imagine is a side cart file.
To save to disk the options are small which is 1024 pixels on the long side. You have the option to export or save to a full size file as well as custom size.
Adding a watermark, change the filename, the colour space or the amount of sharpening is not an option. Better to use Lightroom Classic CC if you need flexibility when exporting.
Conclusion
Having spent time comparing Lightroom CC and Lightroom Classic CC I can see that new software won’t be everyone.
To me it feels the new version of Lightroom is like a lightweight version of Lightroom classic. You have all the tools to do simple edits and photo backup.
If you are a new photographer or someone that does simple editing and doesn’t want to worry about backing up photos, Lightroom CC is perfect for you.
I can definitely see this new version replacing the editing software that comes with a Mac or Windows machine.
I would be happy to recommend this to family and friends that would want something a little bit more then what comes with their current computers. Especially as it allows you to backup and search your photos and gives you more than enough tools to edit with excellent results.
If you are a serious amateur or professional that heavily uses Lightroom’s features and tool sets, Lightroom Classic CC will still be your choice.
Adobe has listened to a lot of peoples gripe with the slowness and along with the new name change to Lightroom Classic CC they have improved the speed of Lightroom from pretty much every aspect from opening up the software to importing to viewing your images and editing it’s very snappy on a modern computer.
Lightroom classic is still much more flexible. The lack of the tone curve, split toning or the HSL sliders will make it a no brainer for more advanced photographers to stay with the classic version.
For me personally, It’s the lack of been able to use presets in multiple stages of my editing workflow. I like to use presets on import, with my meta data, during editing and also on export.
This is not to say that you can completely write off Lightroom CC off.
I can see myself using the software along with Lightroom mobile. Editing & sync photos from my mobile devices to one location and I won’t have to muck around with any catalogues or syncing files it does everything for me. And has worked well for editing quick family photos.
I am confident to say that at this point in time, which is version 1, It will not be put into my everyday workflow.
Lightroom Classic CC will still be my go-to software to edit large amounts of photos fast, such as my sports photos, event photos, weddings. As a self confessed workflow Geek, I find my workflow presets streamline my editing to much to give up.
Leave a Reply
You must be logged in to post a comment.