A Properly planned folder structure is the first step in organising your photos.
In fact having a well organised folder structure for your photos to live in and a backup system that works are the foundations to a good photography workflow.
The file structure I’m going to talk about is what I have been using for a good 10 years. When I was first started photographing sports and later updated it for my wedding and portrait work.
Let me show how you can create something similar and customise it for your photography.
Should You Change Your Current Folder Structure?
This is a good question. Do I need to change my current file structure? Do I simply need a little tweak?
Ask yourself this question.
“If I have to find a photo from a few years ago. Am I able to locate it with the least amount of effort.?”
If you answered NO.
Then you might want to consider. Where and how you keep your photos on your hard drive.
Firstly I don’t expect you to go back and change the folder structure of all your photos from years and years ago.
That would be very painful. Plus changing a folder structure can causes headaches within Lightroom if you don’t do it correctly.
Let’s start organising your photos from today on wards. Let’s concentrate how your photos will be organised in the future.
Where Do I Start?
Let’s start with the end goal in mind.
I’m going to use the example of a wedding photographer. But this could be applied to any type of photography even photography of the family and kids.
The easiest way to do this is to grab a piece of paper and right down the journey that your photos take from downloading your files to the end goal.
Your end goal may be delivering photos to a client on USB. Uploading some photos to a web gallery or even printing and framing them.
This is a very high level view of a process you might take to complete a job for a wedding client.
Download photos > Edit photos > Give to photos on USB > Upload to a web gallery > Post on social media > Make an album or prints > Job completed.
Organising Your Photos With A Simple Folder Structure
Once we have an idea of the step it to complete a Job.
This is now the fun part. It’s where we get to create the folders for your photos.
Once we create the folder structure, we will create a template of empty folders. This will be the template we use every time we start a session or new job.
ROOT LEVEL: This will be the top level of our folder structure. Here we will have a separate folder for each year. Typically I can get 3 to 4 years worth of photos on a hard drive before it fills up.

GENRE: If you photograph more than one type of photography. It might be a good idea to create a folder for each genre of photography you do.
When I photograph a full season of sports and weddings and portraits. The sports photography alone can to produce up to 50 sessions / jobs.
You can see why I’ve chosen to separate each type of photography i do.
You could skip this folder if you wanted to but it really just depends on how many photography sessions you do in a year.
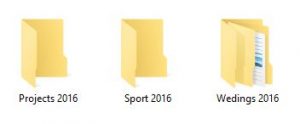
SESSION: Separating each session you photograph into a separate folder allows you to find and back up your photos a lot easier.
Once you start exporting your photos for tasks like full resolution Jpeg’s, album design, printing and resizing for social media. It makes sense to contain everything in the one session folder.
Naming the session folder should be simple and obvious. I use a very simple naming convention for my workflow.
Session number , the thing or person i photographed and date
E.g 0304 Smith wedding 2.1.16
With this simple naming convention, I can look at a folder with a years worth of photos and still find what I’m after. If I know a rough date or the couples name then I’m guaranteed to find my photos.
I also have a register of all my sessions. I use this for my offline hard drives and instead of having to plug in a drive and then search them. The register lives in a binder with other important client information and helps to save time.

WORK AREA: These next set of folders Is where your photos will be organised and segregated.
You’ll see why I do It this in a moment. It works very well and is especially if you do have a large amount of sessions and you know that you’ve got several tasks to complete after you’ve edited your photos.
Note: I should point out that I create a Lightroom catalog for each job. I do this solely for organisation. My best of the best then go into my portfolio catalog.
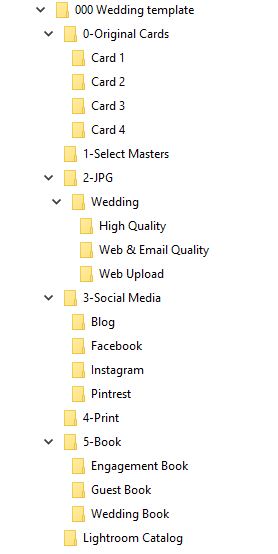
The first folder within the work area is going to be called cards. It’s here that I do a direct file copy from my memory cards on the hard drive and into individual folders for each card.
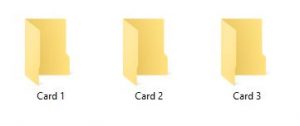
Each card will have its own folder and I do this for three reasons.
- It’s easier to go back and search for photos i might of missed. Say during the culling stage I missed a photo that I remember taking at the later part of the day. If I used four cards, I know to start looking at card 3 or 4.
- It’s going to be the first psychical backup of the session.
- I had an experience were a faulty card reader missed files when importing. Doing a simple file copy and then quickly checking the number of files copied across gives me peace of mind.
SELECT FOLDER: Here is where I’ll be placing the photos I want to import and edit from my session
Maybe it’s a mental thing. But only importing the photos I want to edit means I have less work to do.
As a posed to importing everything into lightroom, then removing or rejecting the bad composed, under or over exposed and out of focus photos.
I’d much rather look at 800 photos instead of 2000 I took during the session.
I use an app called photo mechanic for my culling. It’s super fast and allows me to tag and copy the photos I want. If you have access to Adobe Bridge you could do the same thing. It comes free with Adobe Photoshop or if you subscribe to the creative cloud photography plan, which I highly recommend and use myself.
Next we start to create our export folders.
Lightroom makes it really simple with It’s export presets. Use the keyboard shortcut (mac) Cmd + Shift + E or (win) Ctrl + Shift + E to bring up the export dialogue box. You can have multiple export jobs running at the same time which is a bonus.
Jpeg: I’m just going to keep it simple and have 3 folders in my Jpeg export folder . High resolution, Low resolution and Web upload.

Social media: Depending what platform you’re on you can separate folders for each size. I like to have one for my blog, Facebook and Instagram and Pinterest.

Prints: Here you’re going to have final edited photos resized ready for printing with your lab.
Books: Export the fully edited photos you or your client have chosen for their album.
Lightroom catalog: We have to store the lightroom catalog somewhere. I prefer to have a folder dedicated just for the catalog keeping every thing neat and tidy.
Here is the end result. A place for our photos to be download to from our memory cards. A selects folder to work from or use to import in to Lightroom. Export folders depending on what we are going to do with our photos. A folder for our catalog.
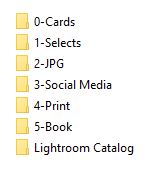
The structure of folders we created can be completely independent of your editing software.
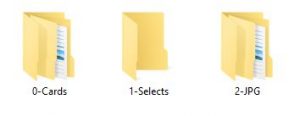
My sports photography workflow is similar. I use photoshop to edit as I find it much faster when doing a smaller amount of photos. So I don’t need the catalog folder and only require one export folder to Jpeg. Here is an eample of they folder layout.
Creating A Template For Future Use
Now we have our folder structure sorted out. Let’s create a template for later use.
Copy the session folder which contains your working folders and place the copy in the root folder or genre folder depending how you structured it.
Now rename the copied session folder to XXXX template. And you guessed it!
Every time we photograph a new session. We are going to copy this template folder, rename it and place our photos in to it. If you shoot different genre, create templates for them for a cleaner folder structure.
Here is an example of the complete folder structure for my wedding photography in a hierarchical view, so it you can also see the sub folders that are nested within.
Where Should You Keep Your Photos?
In an Ideal world. Your photos would be stored on an internal hard drive because it’s going to be the fastest hard drive connected to your computer.
Ideally that drive would have ample space for growth or at least enough to keep a couple of years worth of photos.
Since we don’t live in a perfect world 🙂 If all that you have is an external drive to store you photos. That will also work.
New computers typically come with one hard drive at least 500 gb to 1 tb and sometimes more. That same drive will have your operating system files as well as other documents and files and could fill up quite quickly if you take a lot of photos.
Depending on your computer, such as a desktop tower. You may have the luxury of adding an extra internal drive. Alternately if you use a laptop adding an external hard drive will be your only option.
In a perfect world your operating system would be on a separate drive to your photos. I know for a fact this is not always the case and we just have to make do.
Types Of Hard Drives
A typical hard disk drive ( HDD ) that most new computers come with is a mechanical drive meaning that it has moving parts and is the most cost effective.
Currently the largest drive is 8 TB’s in size! HDD are also known by the way that connected to your computer or the interface they use and can be referred to as SATA drives.
Some computers / laptops have solid state hard drives ( SSD ) these work just like your memory cards, they don’t have moving parts and are super quick.
The drawback is that the size of a SSD at this point in time are not as big as a SATA drive and they are more expensive as well.
You can also get drives which are a hybrid of both SSD and a mechanical hard drive. The way they work is your data is kept on the spinning discs and the information that you access frequently is stored on the SSD portion of the drive which makes accessing information quick.
Personally I have gone with the option of the hybrid Drive. At the time I build my computer it was only $100 more for the same size mechanical drive. The drive is made by Seagate and is a 3 terabyte drive. I think it was money well spent and i’m happy with the performance.
My system drive is an SSD made by Samsung and only 256gb. But is more than enough for the operating system and apps like lightroom and photoshop.
And that is how to organise your photos using a simple folder structure. The thinking behind it is straight forward and can be use for all types of photography both commercial and personal.
Leave a Reply
You must be logged in to post a comment.